Chrome 125 引入了一个 CSS Anchor Position API(锚点定位),它能够让元素相对于页面上的其它元素(锚点)进行定位。相比于传统的定位方式,锚点定位则更加简单灵活。
Warning! Experimental. Expect behavior to change in the future.
官方文档标注这些属性还在实验当中,未来可能会有变更!点击查阅
接下来就简单介绍下锚点定位的基本使用:
基本定位
1、设置锚点:将 anchor-name 属性应用于所选元素,并为其分配唯一标识符,标识符前面必须添加双短划线。
.anchor-ele {
  anchor-name: --anchor-el;
}2、连接锚点:.anchor-ele 将充当锚点,引导其它元素连接至此锚点。可通过以下两种方式连接:隐式锚点 和 显式锚点,区别在于是否在 anchor() 函数中指定锚点名称,显式锚点就显得更加灵活,可用于锚定多个元素。
/* 隐式锚点 */
.position-ele {
  position-anchor: --anchor-el;
  top: anchor(bottom);
}

/* 显式锚点 */
.position-ele {
  top: anchor(--anchor-el bottom);
}
锚点定位基于 CSS 绝对定位。如需使用定位值,您需要为定位的元素添加
position: absolute。
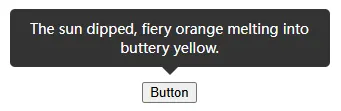
简单写一个 Tooltip 组件:
<button class="anchor-ele">Button</button>
<div class="position-ele">
  The sun dipped, fiery orange melting into buttery yellow.
</div>.anchor-ele {
display: block;
margin: 200px auto 0;
anchor-name: --anchor-el;
}
.position-ele {
background-color: #000000cc;
color: #fff;
padding: 10px;
border-radius: 5px;
font-size: 14px;
width: 300px;
margin-bottom: 15px;
text-align: center;
position: absolute;
position-anchor: --anchor-el;
bottom: anchor(top);
justify-self: anchor-center;
}
.position-ele::after {
content: "";
position: absolute;
top: 100%;
left: 50%;
transform: translateX(-50%);
border-width: 8px;
border-style: solid;
border-color: #000000cc transparent transparent transparent;
}
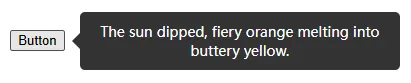
调整一下样式,也可以展示在右侧:
.position-ele {
  background-color: #000000cc;
  color: #fff;
  padding: 10px;
  border-radius: 5px;
  font-size: 14px;
  width: 300px;
  margin-bottom: 15px;
  margin-left: 15px;
  text-align: center;
  position: absolute;
  position-anchor: --anchor-el;
  bottom: anchor(top);
  justify-self: anchor-center;
  left: anchor(right);
  align-self: anchor-center;
}
.position-ele::after {
  content: "";
  position: absolute;
  top: 100%;
  left: 50%;
  transform: translateX(-50%);
  top: 50%;
  left: -16px;
  transform: translateY(-50%);
  border-width: 8px;
  border-style: solid;
  border-color: #000000cc transparent transparent transparent;
  border-color: transparent #000000cc transparent transparent;
}
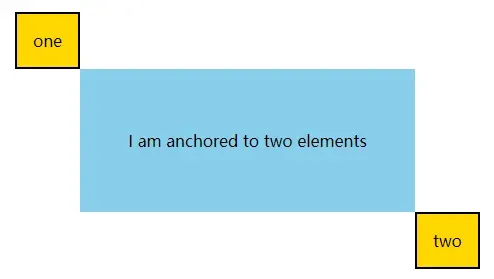
多个锚点
元素可以绑定至多个锚点。在以下示例中,元素的左上角固定在第一个锚点的右下角,元素的右下角固定在第二个锚点的左上角:
.one {
  anchor-name: --one;
}
.two {
  anchor-name: --two;
}
.anchored {
  position: absolute;
  top: anchor(--one bottom);
  left: anchor(--one right);
  right: anchor(--two left);
  bottom: anchor(--two top);
}
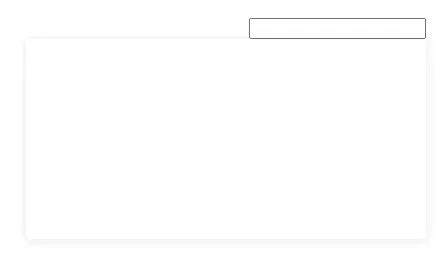
动态调整锚点位置
元素触碰到页面边缘的时候为了防止元素超出界面,可以创建多个备用锚点位置,当页面空间不足以放置这个浮层的时候就会自动使用备用位置。
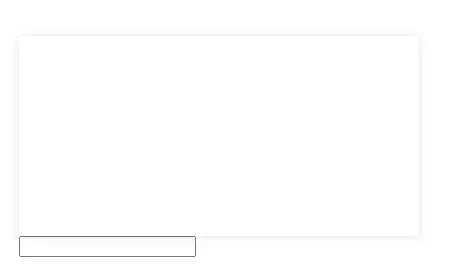
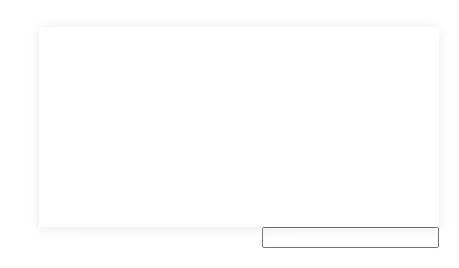
接下来写一个 Select 浮层来展示效果:
<input class="input" type="text" />
<div class="overlay"></div>.input {
anchor-name: --anchor-input;
}
.overlay {
width: 400px;
height: 200px;
background-color: #fff;
box-shadow: 0 1px 10px rgba(0, 0, 0, 0.1);
position: absolute;
position-anchor: --anchor-input;
position-area: bottom span-right;
position-try: --bottom-left, --bottom-right, --top-left, --top-right;
}
@position-try --top-left {
position-area: top span-left;
}
@position-try --top-right {
position-area: top span-right;
}
@position-try --bottom-left {
position-area: bottom span-left;
}
@position-try --bottom-right {
position-area: bottom span-right;
}选择框位于页面左上角时浮层的位置展示

选择框位于页面右上角时浮层的位置展示
选择框位于页面左下角时浮层的位置展示
选择框位于页面右下角时浮层的位置展示
总结
从以上几个示例来看,只用简单的几行代码,就能够实现复杂的布局效果,足以见得这个功能的强大!
CSS Anchor Positioning API 的推出或许是 Web 开发领域的颠覆性改变,大家可以尝试使用这项新特性,以便为未来的广泛应用做好准备。